How to Become a DJ on a Shoe String Budget
This article is too old now and should be deprecated. Technology has moved on quite a bit. I now use powered speakers; but my library is the same. I do not use MP3 tags, but use modified file names, as suggested in this article - Richard Roocroft.
__________
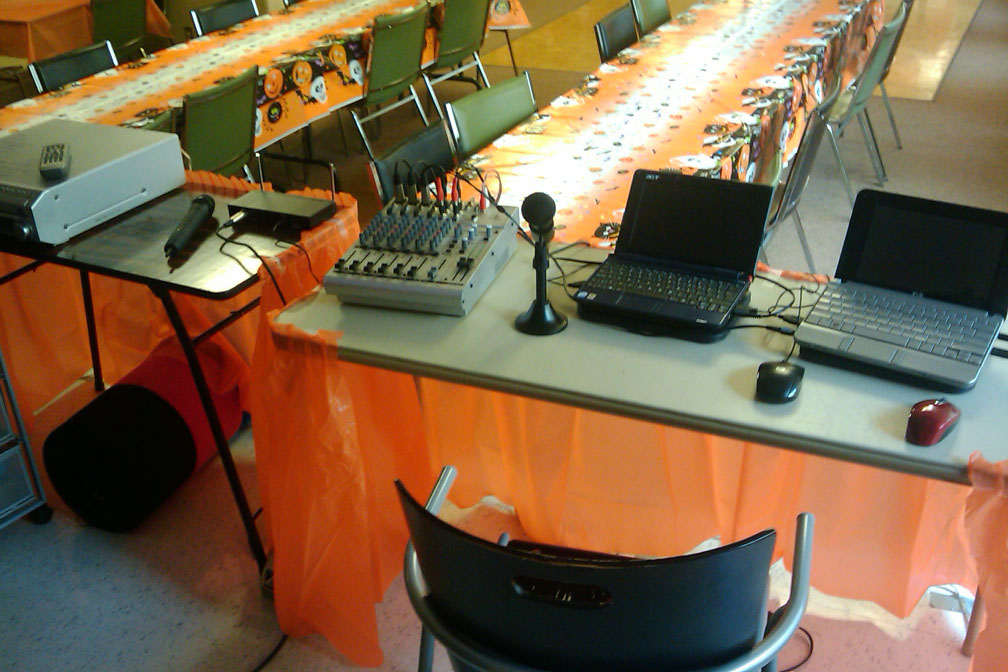
If you are interested in becoming a DJ and have very little money to work with, you may want to see how I did it. The total price is around $400 dollars and the equipment can service about 75 to 100 people. (See the picture)
My amplifier is a Pioneer surround sound XV-HTD520, which is 500 watts. I paid $75.00 for it on Craig's List. The mixer is a run-of-the-mill Behringer UB-1204P-PRO, which cost me $100.00 on Craig's List. And, I have two used netbook computers to run all my software and library of music on. The entire set-up is worth about $400.00. You have to purchase some XLR cables, and at least one cheap dynamic microphone for around $20.00
The Amplifier
Most professionals say you should use expensive PA amps and speakers. If you visit a music store you will see all sorts of powered and passive speaker systems. They range in price from around $500.00 to several thousand dollars. Why did I decide to use a consumer grade “surround sound” amplifier to do a party with 75 people? Because I'm cheap; and I also know something about sound. Five hundred watts is plenty of power for most small venues. The problem is that most DJ's don't want to run wires all over the hall. So they would rather have massive speaker systems on stage. This is usually a problem for people sitting close to the speakers – they get blasted. By using a consumer grade PA amplifier, you must place the speakers in various locations around the room. Therefore you have to run wires and you must make sure they are duct taped to carpets so people don't trip over them. In most cases you have to check the manual for the amplifier to see if there is a mode that uses all of the speakers. In the case of the Pioneer XV-HDT520, I had to use the “virtual surround 2” mode. This means that full audio comes through only four of the five speakers. The center speaker is not connected. I could not find a mode that worked in such a way that the center speaker was activated at the same time with this particular amplifier. Maybe yours will be better. The fronts are 115Watts, and the rears are 52 watts. Therefore (115 x 2) + (52 x 2) = 334 watts. The sub-woofer is another 114 watts. That brings the total power to (334 + 114) = 448 watts. In my case the center channel was only worth 52 watts. In terms of decibels the 448 watts is not much different from the full 500 watts. That's plenty loud.
On one occasion a person grabbed a microphone and screamed into it at the top of his lungs. I had set the level for a reasonable range and was surprised to find that the sub-woofer speaker was distorted after that nice little event. When I went shopping for a replacement, I just happened to find a store that had a variety of sub-woofer speakers. I purchased a nice cylindrical one rated at 130 watts for only $15.00. The amp could pump 114 watts, so this speaker was perfect. See the picture – Bottom Left. I think the new speaker works even better than the original. The room was saturated in low frequencies. This system worked very well. But watch your levels and don't let anyone shout into a mic without somehow limiting the level. You should be able to use any decent consumer grade amplifier for use in a PA setting. Just make sure the manual says that you can get all of the speakers going with pure audio. You don't want effects on the rear channels. You want full spectrum audio. What good is a nice echo delay on the rear channels, when you need lots of power, not effects.
The Mixer
The Behringer UB -1204-PRO mixer is a 5 microphone, 2 line input mixer. Virtually any mixer will do, so don't go spending a lot of money on this. I needed 3 mic inputs because I had a floor mic, a DJ's mic and a wireless mic. The two line inputs are from the two netbook computers. I take the headphone jack output of each computer and run that into the input terminals of the mixer. The software volume settings on the computers are adjusted for max and the level on the board is controlled by the slider for each channel. The output of the mixer goes directly into the AUX input of the surround sound amplifier. You will need a kit of adapter plugs for your mixer. Go to Radio Shack and get some. I use a lot of “one quarter inch, phone to RCA” adapters.
Here is how to properly set up a mixer. Disconnect or turn down the main amplifier temporarily. Set the main output faders on the board to zero. This is about three quarters of the way up on most mixing boards. Now your metering circuitry is calibrated and the mixing board is actually a piece of test equipment.
Let's do one microphone, the rest are the same. Attache the microphone to the channel input XLR jack. Get the talent to do a test count. Typically they want to start talking very quietly for some reason, but get them to give you an example of their “ceiling.” In other words you want them to talk where they will be speaking most loud during the program. Set the fader on the mic channel to zero. Again, this is about three quarters of the way up and this control is usually located closest to you, the operator. There will be another adjustment called the “GAIN” control located close to the microphone connector. This will be the one furthest away form you. Adjust this GAIN control for zero on the metering system (The main VU meter) when the talent is talking most loud. This meter will be bouncing all over the place, but try to get it so the average is near zero with as little overshoot as possible. Now never touch that GAIN adjustment again for the remainder of the venue. This is set in stone. The metering has been calibrated. Do the other mic's the same way. During the show the fader closest to you, the operator, will be raised and lowered as the program dictates, but you never go back to the GAIN adjustment. The board operator (you) is as much a part of the show as any one else. All of the microphone and equipment channels have been set up and calibrated before hand. During the program the only adjustments done should be the faders closest to the front of the board. As the program proceeds the operator will make all last minute adjustments on the main faders This will be done paying close attention to the VU metering system. Most mixers have three controls for the equalizer. These controls are always set to the center. They are there to address real life problems, for example if someone should have an extremely shrill voice or a very deep voice you can compensate for this using the equalizer controls. Otherwise leave them alone.
Now this is important. Make sure you have a small light at your table. When the house lights go down and it's time to dance, you won't be able to see what you are doing. Also mark the front of the mixer with post-it-notes to indicate which pot is for what purpose. You will get confused and adjust the wrong one if they are not marked.
The Computers
Why do we have two computers? Murphy says that if anything that can go wrong, it will. I had one computer fail on me at a party. It crashed right in the middle of a song. I said to the folks that there was a small problem and clicked on the second computer. We were back in business. It seems I had forgotten to plug in the AC power to one netbook and it was running on batteries without my realizing it. Instead of using computers for a source of music, you could use iPods, MP3 players, CD players, or even eight track machines if you want.
On each computer I like to use Windows Media Player to actually play the songs. That's right, I don't use any expensive unnecessary software to play music. Windows Media Player is capable of doing anything a DJ would need to have done. I'll explain that in the next section. If you prefer to use Linux that works OK as well. It's what ever you are comfortable with.
Any computer from a Pentium 4 onward is more than OK for audio work. Don't think you need the best. If you are unsure of the hard drive condition, use a product called Spinrite on it. This is the only hard disk recovery product that will bring back to life old hard drives. If your gig is important use Spinrite.
The Library
Here is a secret to maintaining a music library that few people realize. Don't bother with MP3 tags. Lets say you download your music through iTunes. Right after purchasing the song, you immediately right click on the song and make an MP3 version out of it. Apple's iTunes has some options to be able to do this. Once the MP3 version is created you drag and drop that song out of iTunes and onto your desktop. At this point you will click on the file name and edit it to reflect two pieces of information. First, the name of the song; and second, the singer's name or group's name. From this point onward, you will never have to worry about MP3 tags again. The “file name” contains all of the information that you will ever need to locate this on your computer using a standard Windows search. Copy your file to a folder tree that exists outside of iTunes. Here you can control your library tree structure without ever worrying about being able to find a piece of music. I suggest you organize your music into a main folder like “Music-Main Library” or something like that. Then you make a folder, for each CD, album, or category of music you want. You can make any number of layers of folders you want, but I suggest you only use two levels of folders.
Copy this folder structure to multiple drives, making one the canonical version. In other words one file structure is the MASTER. All others are only copies. If you already have a library, this process of changing the file names may be difficult, but if you don't do it, you will never have full control of your library. The music industry wants you to be dependent on MP3 tags. There are hidden tags that you can't normally see. This is a system for tracking boot leg songs.
How do I find my music once it is on the computer? With Windows Explorer (This is the file manager, not Internet Explorer) Navigate to the root of your tree structure. This may be the “Music-Main Library” folder. Now locate the little search box in the upper right corner of the window. Type in a file name, or singer's name. As you type, Windows Explorer will search the tree structure underneath and will “pop up” all sorts of songs that match your search. When I get someone at a party asking for a certain song, I will use one of my computers to do this exact kind of search. Since my library does not use MP3 tags, but only uses the file names, I immediately know if I have the song on my system. Both computers have the exact same library on each one.
I like to make play lists by creating another folder system titled “Play Lists.” Here I copy songs from my main library and create a second folder structure. This is where my main party program material gets played “from.” All play lists can be erased confidently, because the main library is where every song is located permanently. By using Windows Explorer, I can search any folder structure. I can even search an entire hard drive if that is necessary. When you want to play a song simply double click on it, and Windows Media Player starts up. You will always have at least two windows open on your computer screen at any time. One or more windows is for Windows Explorer and the other is for Windows Media Player. Remember there are different views of Windows Media Player. There is a learning curve here. Windows is not intuitive. You may have to dig a little bit to get to know the system. In some cases with Windows, you cannot see an option until you expand the window to full screen. It then becomes visible.
Lets say you want to play songs on lines 3, 6, and 9 of a given window. Just hold down the control key when selecting these songs. After your selections are made you can right click a selected song and Windows Explorer suggests “PLAY.” Press play and Windows will play each selected song sequentially. People underestimate how good Windows is for this type of thing. It's worth spending a little bit of time learning it. People go out and buy expensive software without realizing the power of what they have.
If you want to run a “sound board” with special sound effects, just create a folder and copy your sample sounds to that folder. The trick is to name each sound file with a name that makes sense. If you have a sound of people clapping, you may want to change the name to “applause 30 seconds” or something like that. When you want to play it, just double click the file by that name, and it will immediately start playing through Window Media Player. The reaction time is very fast. Don't go out and purchase expensive sound board software. This system works with almost any sound format. You can get most sounds free by searching the internet and right clicking the WAV or MP3 file. Then “save target as” if you are using Internet Explorer.
If you are in love with the way iTunes, or many of the music management programs work, then perhaps this is not for you. But if you want full control of your library without fear of ever loosing a song, you should consider using this method. Manual control using file names is the only safe way to go. Each time you obtain a new piece of music, edit the file name to reflect the information you want to search on. Then music management becomes easy.
This is how I became a DJ on a shoe string.
Richard Roocroft
October, 2011
Rustymicrophone.com, Email: rustymicrophone@gmail.com